Winter Wonderland

Wednesday, January 27, 2010

Welcome To The Group #3


Finally I made new template. It's #3 this time. Download-HERE . Enjoy your new template. :)


Sunday, January 24, 2010

Believe & Trust Masked


PSP 7, 8, 9, 10, 11 OR 12Tube of choose-I use Caron Vinson. You must purchase this tube from CILM-HERE
Font of your choose
Monti Pixel Playground-You can find her mask (monitblindmask 1) and scrap kits. Download mask-
HERE and scrap kits(Looking for Black/Pink scrap kits and Monti’s Bow and Ribbons as well as Monti‘s Love scrap kit) -HERE


1.Open New Image, fill with white


2.Layer/New Layer. Fill with black. Layer/Mask/Load/Save From Disk. Find montiblindmask 1. Layer/Merge/Merge Group.


3.Open Monti BlackPinkButton2. Copy and back to your canvas, paste as new layer.


4.Open MontiBrightPink (bow). Copy and back to your canvas, paste as new layer. Resize 75%, 3 times. Move a little bit right and down on the button. See my tag above.


5.Open MontiLoveBurgundyHeartsPaper. On your palette (layers), click on mask. Selection/Select All, Float, Defloat. Copy MontiLoveBurgndyHeartsPaper and on your canvas, paste as new layer. Selection/Invert. Hit delete on your keyboard. Select None.


6.Open MontiLoveBurgundy-Believe Button. Copy and on your canvas, paste as new layer. Resize 75% (once).


7.Open MontiLoveBurgundy-Trust Button. Copy and on your canvas, paste as new layer. Resize 75% (twice). Move Trust a little bit far down(see my screenshot).


8.Open MontiLoveGoldStaple. Copy and on your canvas, paste as new layer. Move a little bit right between 2 hearts (see my screenshot).


9. Open tube of your choose. On your palette, click Monti BlackPinkButton2. Selection/Select All, Float, Defloat. Selection/Modifty/Contract/Pixel-15. Copy your choose tube and on your canvas, paste as new layer. Selection/Invert. Very tricky to erase the tube. Eraser Tool-click on pencil and make sure that the palette must be activity tube to erase it. Erase all around the button on bottom. See my tag above. Select None.


10.Layer/Merge/Merged Visible.


Save as jpg or png.


Be sure to add copyright information/url included your watermark on your tag.


Thursday, January 21, 2010

Back To School Template #2

UPDATE ON TEMPLATE-I made second template and it's called Back To School.


DOWNLOAD-
HERE

Wednesday, January 20, 2010

Be My Valentine #1

I have decide to make my VERY FIRST TEMPLATE. I think it turn out it's pretty good. I will keep update by put my cap on/thinking. Here is the first one that I made.


You can download-HERE

Sunday, January 17, 2010

Be My Love (avatar/footer)


PSP 7, 8, 9, 10, 11 OR 12
Tube of choose-I use Jamie Kidd. You must purchase this tube from CILM-HERE
Eye Candy 4000 and Mura Meister-HERE
Gxchic_BlingGarden-Bling-HERE, she isn't sure if it's her credit.
Choose of brush (I had SxyCrzyKewl-I don't remember where did I get this)
Font of choose

Let's start with footer first. Avatar come in later

1.Image/New Layer, fill with #ad4b85 or your choose


2.Eye Candy 4000/Swirl


Effect/Blinds


3.Layer/New layer, present shape-rectangle, fill with #5f0033 or your choose. Drag along down (see my screenshot). On same layer, magic wand. layer/new layer, selection/modifty/contract/pixel-6. Hit with your keyboard to delete. Select None

4.Close background. Raster 1 and 2 to Layer/Visible/merged. On same layer, opacity 38. You should have 2 layers. Dupliciated, image/mirror, (see my screenshot)

5.Present shape-rectangle. Fill with #5f0033 or your choose. Drag along with very long (see my screenshot). Move it a little bit down. Duplicated. Image/flip.

6.Copy your choose tube and on your canvas, paste as new layer. If the tube is too big to fit. Image/resize 75%. No ticked on resize all layer. Contiue if this tube is still too big until you get right size. Move it over to left side.

7.Font of your choose. I use plainBlack. Vector/Direction/vertical and left. PlanBlack/48/stroke 2.0. Just type "BE" (see my screenshot). I use light pink (#f5c3c) for background and white for foreground.

8.Open GxChic_BlingGarden_Bling. Eraser Tool/eraser to erase all that left 1 diamond. Effect/Mura Meister


9.Layer/new layer. Fill with black. Paint Brush-Looking for SxyCrzyKewl. I can't remember where did I get this brush. Brush of choose. Move it up to right corner (see my screenshot).

10.Selection/Select All. Layer/New layer, fill with gold or your choose. Selection/Modfty/contract, Pixel. Hit with keyboard to delete. Layer/Visible/merged.

Save as jpg or png

For this avatar-

1.New Image-300 x 300-#ad4b85
2.Repeat Eye Candy 4000/Swirl.
3.Copy same tube of your choose and on your canvas, paste as in new layer
4.Layer/new layer, fill with choose
5.Repeat in step 10
6.Layer/Visible/merged

Save as jpg or png

Be sure to add copyright information/url included your watermark on your tag.

I hope you enjoy your new tag

Saturday, January 16, 2010

L'AMOUR!!!


PSP 7, 8, 9, 10, 11 OR 12
Artmama Template-you can find it-HERE, you can download from there
Artmama Scrap Kits (ftu and looking for L-AMOUR ON VERY TOP)-you can find it-L-AMOUR, you can download from there
Font of choose
Tube of choose-I use Rachel Anderson. You must purchase this tube from CILM-HERE

1. Open Artmama Template 14-valentine. CRTL and D to duplicated then closed the one that you open

2.On your layer-click rectangle. Selection/Select All/Float/Defloat. Open Artmama l'amour 09. Copy and go back to canvas, paste into selection. Select none. Effect/Texture/weave


3.On your layer-click circle-repeat in step 2, fill with colors or patterns, or gradient of choose. Except no weave. Select None.

4.On your layer-click on tiny words-repeat in step 2 and 3. Select None

5.On your layer-click on strip. Open Artmama l'amour 03, copy and go back to canvas, paste into selection. Effect/Texture-repeat in step 2. Select None

6.On your layer-click on cback. Repeat in step 2 and fill with colors of your choose, except no weave. Select None

7.On your layer-click on hback, repeat in step 2 and 6. Select None

8.On your layer-click on heart. Adjust/Hue and saturation-colorize or your choose color


9. On your layer-click on circle (above cback), repeat in step 2 (no weave) and 8

10. Copy your choose tube and go back to your canvas, paste as new layer, just move a little bit right.

11. Layer/Merge/visible merged.

Be sure to add your copyright info/URL included watermark on your tags.

I hope you enjoy your new tag

Wednesday, January 13, 2010

Winter Is So Wonderful


PSP 7, 8, 9, 10, 11 OR 12
Filter required: DSB FLUX-download-HERE
Monti's Pixel Playground-HERE. Click on scrap kits, scroll all down and click on bear, it will take you there and scroll all half down and find Bows and Ribbons under "A Private's Life For me" then download it there


supplies-HERE
Font of your choose

1.New Image 775 x 475-white


2.Open SXC (the watermark come with it). Copy and on your canvas. Layer/new layer, selection/select all. Paste as selection paste. Select None

3.Present Shape/rectangle. Fill with black (wide 6.00 on tool bar of psp). Drag along until you have enough space for your wordart (it come with the supplies). Covert to raster layer. With your mover, move a little bit down under the trees. On your layer, opacitiy to 42. Effect/DSB FLUX/LINEAR TRANSMISSION


4.On your layer, click bottom

Layer/new layer, fill with black. Layer/mask, looking for montibirdmask then ok. Make sure it's tick on hide all mask


5.Layer/New layer-fill with color/pattern of your choose. I use gold2 (it come with the supplies). Selection/Select All. Modifty/contract/pixels 6

Hit delete on your keyboard. Select None

6.Open Monti-BlackWhite, copy and paste as new layer. Move it over to left corner. Effect Drop Shadow


7. Copy Winter Is So Wonderful Wordart to your canvas and move it on the linear transmission.

8. Layer/Merge/Visible Merged.

SAVE AS GIF OR PNG

Be sure to add copyright information/url as well as watermark.

Saturday, January 9, 2010

Addiction To Cat Avatar/Footer


PSP 7, 8, 9, 10, 11 OR 12
Filter required: Richard Rosenman Filters-download-HERE and Animation Shop 3 verson
Tube of your tube. I use Sue Dawe. Purchase CILM-HERE


Are you ready to learn? Let's go!!

Let's start with footer first-

1. File/New Image-575 x 300, fill it with white, click ok


2. Layers/New Layer. Fill it from the tube of your choose. I fill it with #b797e

3. Effect/Richard Rosenman Filters/Scalines-Default


4. Layer/New layer-fill it with #1a6ad9 (or your color choose)

5. Present Shape/Rectangle-shape longer like mine (see above). Deform to make it strench down (see mine)

6. Effect/3D/Inner Bevel


7.Effect/Texture/Blinds


8.Copy your tube of choose on your canvas as New Paste. If the tube is too big to fit in. You can resize whatever you like

9. Layer/new layer and fill it with #b11867 (or your choose color)

10. Dupilicated 2 times. You should have 3 layers. On your layer click it and type scaline, repeat on 2nd and 3rd

11. On your 1st layer-click right/view/currently only. Effect/texture/weave


12. On your 2nd layer-click right/view/currently only. Effect/texture/weave


13. On your 3rd layer-click right/view/currently only. Effect/texture/weave


14. On your layer palette-close scalines 1 2 3. Everything below down. Layer/Merge/visible merge/merged. Below down-dupicilated 2 times. Should have 3 layers then close on this layers

15. Again on your layer palette-everything above-layer/merge/visible merge/merged. Once again, dupicialted 2 times. Should have 3 layers

16. To make animated. Open bottom/scalines/top to visible merge. Keep going on until you have all 3 layers

17. To make border-layer/new layer, fill it with gold (or your choose color)

18. Selection/All Select. Modifty/contract 5. Hit delete with your keyboard. The gold (or color choose) should be there. Select None

19. Once again, dupliciated 2 times until you have 3 layers

20. Font of your choose. I use feena casual (can't remember where I get this) Just type whatever you like (see above-Addiction To Cat)

21. Repeat from step 19


Now for animation shop

1. On your 1st layer-copy then go to AS3-paste as new animation

2. On your 2nd layer-copy then go to AS3-paste as after current frame

3. Repeat on your 3rd, then repeat on AS3

4. On your keyboard, crtl-A/Select All

5. Click right/frame properties/25

That is it!! Be sure to add copyright information/URL. Also be sure to add your watermark on your tags.

Avatar

1. New Image 300 x 300

2. Repeat from step 1-8. Merged

3. Repeat from step 17 & 18. Merged

Save as gif. Enjoy your tags!!! Once again, be sure to add copyright information/URL. Also be sure to add your watermark on your tags.


CREATED/WRITEN BY CMSD76

Wednesday, January 6, 2010

Winter Wonderland Avatar/Footer


PSP 7, 8, 9, 10, 11 OR 12

Filter required: Eye Candy 4000/Swirl-Downoad here and filter: Texture Effect/Blinds (it does come with psp version)

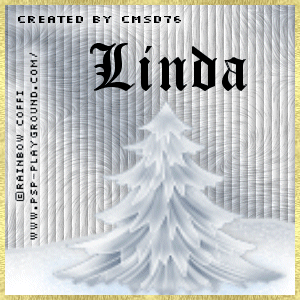
Tube of choose. I choose Rainbow Coffi-Download-HERE, unless you have to register FIRST or already member for download her tubes.

Are you ready to learn? Let's go!!

Let's start with footer first-

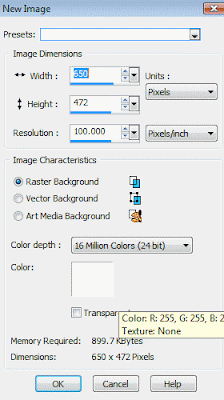
1. File/New Image-575 x 300, fill it with #bec8do, click ok


2.Layers/New Layer

3.Make gradient is so easy to created. Click on gradient then click edit


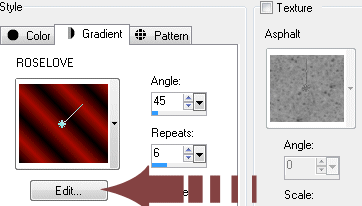
When you click on edit, the window pop up that says gradient editor, just click on NEW, again just type whatever you want to type in. For example mine says WINTERLISH and click ok. Match color from one of your tube choose, click on first arrow and click on second arrow. Click close (if the window pop up that says "Do you want to save the change?-click yes. Easy isn't it? Make sure angle is at 45 and repeat 6 and tick on invert. Fill it with gradient

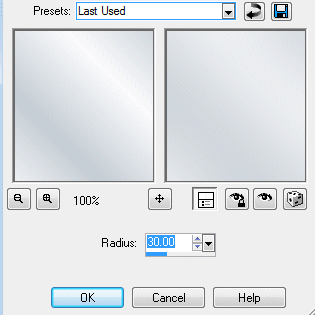
4.Adjust/Blur/Gaussian Blur-30.00


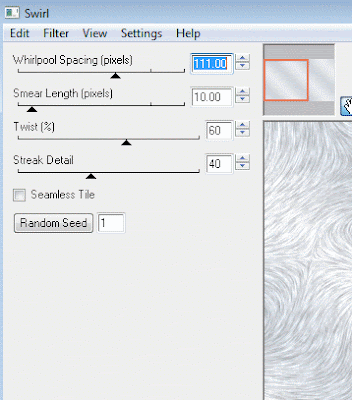
5.Effect plugin/Eye Candy 4000/Swirl


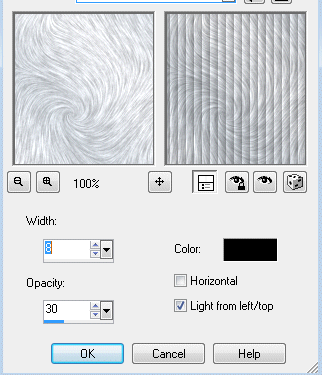
5.Effects/Effect Texture/Blinds


6. Present Shape/Rectangle-click on graident that you already made earlier. Again make sure angle is at 45/repeats 6 and tick invert. Drag your rectangle long (see my footer on top). On your layer (right side), opacity 47. Dupliciated and drag on bottom

7. Copy your tube and paste as new layer

8. Font of your choose. I choose Miss Lanfort (I can't remember where I get this one). Font-22-black. Just type Winter is so white as brightly! Winter in Wonderland
or YOUR CHOOSE!

9. Layer/Merge/Meerged visble

10.Layer/New layer

11. Fill it with gold or your choose

12. Selections/Select all

13. Selection/Modifty/Contract-5

14. Make sure you add your copyright information/URL and add your watermark.

15. Save as jpg or png (your choose)

For Avatar-
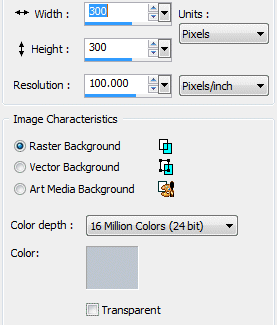
1.File/New Image-300 x 300-fill it with white

2. Same as step 2-15,

Once again save as jpg or png

ENJOY YOUR BEAUTIFUL AVATAR/FOOTER!